Best 35mm Film Negative Scanner: How to Choose One
The best 35mm film negative scanner for most home collections is a dedicated film scanner with a high optical resolution and an infrared dust-removal channel, such as the Plustek OpticFilm 8200i SE. An all-in-one like the Kodak Slide N Scan suits mixed slide-and-negative archives and quick screen previews, while a photo scanner like the Plustek ePhoto Z300 covers prints rather than film.
On this page (8 sections)
- Which type of scanner fits a 35mm negative collection?
- Which specs decide scan quality for 35mm negatives?
- How much resolution do you need for a 35mm negative?
- How does dust and scratch removal change the job?
- Is an all-in-one film and slide scanner enough for home use?
- When does a dedicated 35mm film scanner earn its place?
- What about scanning prints and documents alongside film?
- Which model should you buy for your archive?
The best 35mm film negative scanner for most homes is a dedicated film scanner with high optical resolution and infrared dust removal, because 35mm frames are small and reward every bit of detail the sensor can capture. An all-in-one film and slide unit is the simpler pick when your archive mixes negatives and mounted slides.
A photo scanner fits only if your main job is prints, not film.
Your choice comes down to three hardware types and what each one asks of you. This guide walks through the specs that matter for negatives, the trade-offs of each type, and the product we would start with for a typical shoebox of 35mm film.
Which type of scanner fits a 35mm negative collection?
A dedicated film scanner gives the best detail for 35mm negatives, while an all-in-one film and slide unit trades some resolution for speed and a built-in screen. A flatbed photo scanner belongs in the mix only when prints share the workload.
The type matters more than the brand, because each design changes how you feed film, how much you can clean up dust and how long a roll takes.
A dedicated film scanner holds the strip in a carrier and moves it past a sensor built for tiny frames. That design puts the resolution and the light path where 35mm needs them.
An all-in-one unit pulls film or slides through a tray and shows the image on its own display. A flatbed places the film on glass and scans the whole platen, which is convenient but spreads its sensor across a larger area.
The right type follows your archive. A few dozen strips of color negative film point to a dedicated scanner.
A mixed box of negatives, 110 film and mounted slides points to an all-in-one. A collection that is half prints and half film favors a flatbed with a film adapter.
Our slide and negative scanner overview covers the same types for readers who also have slides to handle.
Pick the type by your film first, then compare models inside that type. Buying the wrong type costs more than buying a mid-range model of the right one.
Which specs decide scan quality for 35mm negatives?
The optical resolution, bit depth and dynamic range carry most of the quality for a 35mm negative scan. Marketing numbers help only when they describe the sensor, not software interpolation.
Read the spec sheet for these four values before you compare two models.
Optical resolution is measured in dpi and describes how finely the sensor samples the film. A 35mm frame is small, so detail runs out quickly on a low-resolution scan.
Bit depth describes how many shades each color channel records. A 48-bit scanner captures more color steps than a 24-bit one and gives you more room to correct faded dye.
Dynamic range describes how well the scanner holds detail in both the bright and dark parts of a frame. Color negatives compress a wide range of brightness into a low-contrast image, so a scanner with more range recovers more of it.
Multi-exposure modes on dedicated film scanners exist to extend that range further.
Sensor type matters too. CCD sensors are often chosen for color accuracy and depth of focus, which helps when a strip is not perfectly flat.
Look at the resolution figure as a floor, not a headline.
| Spec | Why it matters for negatives | What to favor |
|---|---|---|
| Optical resolution | Detail in a small 35mm frame | Higher true optical dpi |
| Bit depth | Color steps and room to correct | 48-bit input |
| Dynamic range | Detail in bright and dark areas | Higher range and multi-exposure |
| Sensor type | Color accuracy and focus depth | CCD for film work |
Treat software-interpolated resolution as a bonus, not a reason to buy. The optical figure is the one your scans actually depend on.
How much resolution do you need for a 35mm negative?
For a 35mm negative, aim for a scanner that reaches at least 3200 to 4000 dpi in true optical resolution, and step up when you plan to crop or print large. Higher settings exist, but they cost time and storage.
The useful number depends on what you will do with the file.
A scan around 4000 dpi captures most of the detail in a well-exposed 35mm frame and supports a good-sized print. A 7200 dpi model leaves extra headroom for tight crops and enlargements.
The jump from 4000 to 7200 dpi is not linear in usefulness, though. At the highest settings each frame takes longer and the file grows fast.
Think about the destination before chasing the top figure. A scan meant for a family slideshow or a phone screen needs far less than one headed for a large wall print.
If you plan to scan hundreds of frames, a moderate resolution with dust removal on is often the better routine than a maximum-resolution pass on every frame.
Also check the output bit depth. A 48-bit capable scanner gives you more editing room when the negative is faded or has a color cast.
For a deeper comparison of resolution against price, our roundup of the best scanners for 35mm slides covers how the numbers play out across models.
Set your target print size first, then choose the resolution that reaches it without wasting time on frames you will only view on screen.
How does dust and scratch removal change the job?
Infrared dust removal saves hours of manual spotting on color negatives and slides, and it is the single feature that most changes how a film-scanning session feels. The scanner records an infrared pass that sees dust and scratches but not the image, then uses that map to fill in the defects.
Without it, every speck becomes a small repair in an editing app.
The feature works best on color film. The infrared channel detects surface defects on color negatives and slides without retouching the image by hand.
Black-and-white film is the exception, because the silver in the emulsion can confuse the infrared pass. If most of your archive is monochrome, expect to spot those frames yourself.
Infrared cleaning also adds time per frame. A scan with it switched on takes longer than a plain pass, so weigh the cleanup against your patience.
For a small collection of treasured frames, the quality gain is worth the wait. For a large box of everyday snapshots, you may prefer speed and accept some manual cleanup.
Check that the scanner's software actually supports the infrared pass, since the hardware alone is not enough. Dedicated film scanners that bundle a full editing suite make the workflow smoother.
The 35 mm slide scanners guide explains the same cleaning step for slide scanning.
Choose infrared cleaning if you have color film and little patience for spotting. For black-and-white archives, budget your time for manual repair instead.
Is an all-in-one film and slide scanner enough for home use?
Yes, an all-in-one film and slide scanner is enough for quick digitizing and sharing, but it gives up some resolution and color depth against a dedicated film scanner. It wins on convenience.
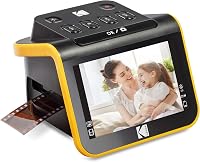
The Kodak Slide N Scan shows the trade-off clearly.
Its 22MP CMOS sensor records 24-bit color and saves files straight to an SD card, so you can scan without a computer attached. The 5-inch LCD with gallery mode lets you preview and edit each frame before saving.
A Type-C USB port and HDMI output let you connect it to a computer or a TV.
The easy-load inserts accept 135, 110 and 126mm film plus 50mm slides, with continuous feeding that speeds up a mixed box. On-screen controls handle film type, color and brightness, and the unit assigns date and time to files.
For a family archive headed for a slideshow or shared drive, that workflow is hard to beat.
The limits are real for serious archiving. A 24-bit output and 22MP capture hold less color and detail than a dedicated scanner's 48-bit, 7200 dpi pipeline.
An SD card is required and not included. If you want maximum quality from prized negatives, this unit is a fast first pass rather than the final word.
Our duplex scanner for home use guide covers the paper side of a home digitizing setup.
Pick an all-in-one when speed and a built-in screen matter more than the last bit of detail. For archival masters, keep reading.
When does a dedicated 35mm film scanner earn its place?
A dedicated film scanner earns its place when detail, color depth and dust removal matter more than speed, which is the normal case for a collection you plan to keep and print. The Plustek OpticFilm 8200i SE is the model we would start with for that job.
Its 7200 x 7200 dpi sensor resolves about 69 megapixels across a 35mm frame, with 48-bit input and 24 or 48-bit output. The integrated infrared channel detects dust and scratches on negatives and slides and removes them without hand retouching.
A 3.6 dynamic range and multi-exposure function extend detail in difficult frames, backed by 64-bit hardware and software support.
The bundle includes Plustek QuickScan and LaserSoft Imaging SilverFast SE Plus, which covers the editing and color-correction work that negative film needs. Two film holders and two slide holders ship with it, so you can move between strips and mounted slides.
It supports Windows 7 through 11 and Mac OS 10.7 to 14.x, with drivers from the Plustek site.
The trade-off is speed and fuss. Every frame goes through a holder, and the high-resolution, infrared pass takes time.
There is no screen and no card slot, so a computer is part of the workflow. For a small collection of negatives you care about, that patience pays back in the files.
For a thousand casual snapshots, the all-in-one above is the faster route.
Choose a dedicated film scanner when the scans are the archive, not just a copy. Then set realistic expectations for how long each roll will take.
What about scanning prints and documents alongside film?
A photo and document scanner like the Plustek ePhoto Z300 covers prints and paper well, but it is not a 35mm negative scanner. It belongs in the plan when your box holds prints as well as film.
Buy it as a companion, not as the film machine.
Its CCD sensor and roller feed handle 3x5, 4x6, 5x7 and 8x10 prints plus letter and A4 paper, with 300 or 600 dpi settings. A 4x6 takes about 2 seconds at 300 dpi, so roughly 1,000 prints fit into an afternoon.
The roller system is designed to be gentle on old photos, and the thickness limit is 0.76mm, which covers Polaroid-style prints.
Software handles auto-crop, rotation and faded-color restoration, and files can be saved in several formats or sent to cloud storage and social sites. It is a simplex scanner, so two-sided documents need a manual flip or a software merge.
It has no film carrier and no infrared channel, which is why it stays out of the negative-scanning decision.
The practical setup is two machines for two jobs. Use the ePhoto for the print shoebox and a film scanner for the negatives.
If your film is the main event, put the budget there first. The slide and negative scanner roundup compares film-focused models in more depth.
Add a print scanner only after the film scanner is settled. Prints and negatives ask for different hardware.
Which model should you buy for your archive?
The best 35mm film negative scanner depends on your mix of film, slides and prints, so match the model to the archive in front of you rather than the biggest spec sheet. Three paths cover most home collections.
The Kodak Slide N Scan is the easy start when your box holds color negatives, 110 or 126 film and mounted slides together. Its screen and card slot mean you can digitize without a computer and see each frame as you go.
It is the pick for speed and sharing.
The Plustek OpticFilm 8200i SE is the choice when the negatives are the archive. Its 7200 dpi, 48-bit pipeline and infrared cleaning produce the kind of master file you can print and edit for years.
Accept the slower per-frame workflow and the computer connection as the price of that quality.
The Plustek ePhoto Z300 is the companion for prints and documents, not film. Add it when the shoebox holds photos as well as strips.
Our scanner for 35mm slides and 35 mm slide scanners guides cover the slide side in detail if mounted slides dominate.
A simple rule closes it out. Pick the all-in-one if you want speed and a screen for a mixed archive.
Pick the dedicated film scanner if you want the best 35mm film negative scanner for archival quality. Add the print scanner when the prints demand their own machine.
Frequently asked questions
What resolution do I need to scan 35mm negatives?
Aim for a scanner that reaches at least 3200 to 4000 dpi in its optical specification for a print-quality 35mm scan. Higher settings like 7200 dpi give more room to crop or enlarge, but they also slow each frame and produce larger files.
Is a flatbed or a dedicated film scanner better for negatives?
A dedicated film scanner usually wins on detail and dust removal for 35mm negatives because its sensor and film holder are built for small frames. A flatbed with a film adapter is the better choice when you also need to scan prints and documents.
Can I scan negatives without a computer?
Yes. Standalone film scanners with a built-in screen and an SD card slot let you preview and save scans without a computer.
You still need to move the card to a computer or card reader to edit and back up the files.
How long does it take to scan a roll of 35mm film?
Time depends on resolution and whether dust removal is on. A dedicated film scanner at a moderate resolution handles a 36-exposure roll in a reasonable sitting, but high-resolution passes with infrared cleaning add time per frame.
Does infrared dust removal work on black-and-white negatives?
Infrared dust removal is designed for color negatives and slides. On many black-and-white films the silver in the emulsion interferes with the infrared channel, so plan on manual spotting for those frames.
What file format should I save negative scans in?
Save a TIFF or high-quality JPEG master for each frame and keep it backed up. TIFF keeps more detail for later editing, while JPEG is easier to share; you can always make smaller copies from the master.