How to Install the Canon LiDE 300 Scanner
To install the Canon LiDE 300, connect the USB cable, install the Canon software and driver, then scan a test page. The scanner draws power over USB, so you don't need a separate adapter.
On this page (9 sections)
- What comes in the Canon LiDE 300 box?
- How do you connect the Canon LiDE 300 to your computer?
- How do you install the Canon LiDE 300 driver and software?
- How do you run the first scan on the Canon LiDE 300?
- How do you set up scanning to the cloud?
- Why won't the computer detect the Canon LiDE 300?
- How do you keep the Canon LiDE 300 running cleanly?
- Which scanner should you compare before you commit?
- How do you finish installing the Canon LiDE 300 scanner?
To install the Canon LiDE 300, connect the USB cable, install the Canon software and driver, then scan a test page. The scanner draws power over USB, so you don't need a separate adapter.
The whole job takes about 15 minutes on a normal desktop or laptop. This walkthrough covers what ships in the box, the order to do things in, and the fixes for the handful of problems that trip people up when they learn how to install the Canon LiDE 300 scanner.
What comes in the Canon LiDE 300 box?
The box holds the scanner, a setup CD, and a USB 2.0 cable with a standard USB-A end for the computer and a mini-B end for the scanner. You don't need to buy a cable unless yours is lost or too short.
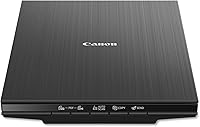
The unit itself is a slim flatbed: 14.5 inches deep, 9.9 inches wide, and 1.7 inches tall, at 3.6 pounds. That footprint fits on most desks beside a keyboard.
It's a document and photo scanner with a single-sheet flatbed, LED light source, and 48-bit color depth. Resolution is 2400 x 2400 dpi, which is plenty for photos and everyday paperwork.
Canon backs it with a 1-year limited warranty.
The setup CD is convenient, but the newest driver often lives on Canon's support site. If your computer has no disc drive (most modern laptops don't), plan to download instead.
How do you connect the Canon LiDE 300 to your computer?
Plug the mini-B end into the scanner and the USB-A end into a direct port on your computer, then let the system see the device. The LiDE 300 is bus-powered, so the one cable carries both data and power.
Use a USB port on the computer itself rather than an unpowered hub. A hub that splits power across several devices can leave the scanner short of current and cause dropped scans.
Keep the scanner on a flat, stable surface near the computer. Leave room to lift the lid and lay documents flat on the glass.
If you're installing on a laptop, plug the laptop into power first so a low battery doesn't interrupt the driver install.
What order should you connect and install in?
Install the software first, then connect the scanner when the installer asks. This order lets the driver register before Windows or macOS first sees the device.
Some installers handle everything automatically. Others pause and prompt you to attach the scanner.
Follow the prompt rather than plugging in early.
If you already connected the scanner before installing anything, unplug it, run the installer, and reconnect when prompted. That one change fixes a lot of "device not found" errors.
How do you install the Canon LiDE 300 driver and software?
Run the Canon setup program from the CD or from Canon's support downloads, then follow the on-screen steps. Choose the full software package rather than the driver alone if you want the scan buttons to work.
The installer adds the driver plus Canon's scanning utility. That utility is what makes the four EZ buttons on the scanner useful: PDF, AutoScan, Copy, and Send.
Installing from the setup CD
Put the CD in the drive and let it autorun. If nothing opens, browse the disc and run the setup file manually.
Accept the license terms and pick a typical install.
The installer copies the driver and the scanning utility, then asks you to connect the scanner if it isn't already. Reconnect when prompted and let it finish.
Installing from Canon's download page
Go to Canon's support site, find the LiDE 300 in the scanner list, and download the driver and software for your operating system. Canon lists Windows 7 as the minimum system requirement, so confirm your OS version is covered.
Close other programs before running the installer. When it finishes, restart the computer if it asks, then open the scanning utility to confirm the scanner appears.
How do you run the first scan on the Canon LiDE 300?
Open Canon's scanning utility and scan one test page to confirm the driver, cable, and scanner all work. A plain sheet with a few lines of text is enough.
Lift the lid and place the page face down against the glass. Align it with the corner guides, then close the lid gently.
In the utility, choose a simple mode first. Auto Scan Mode detects what you're scanning and adjusts the settings for you, which is the easiest starting point for a mixed stack of papers and photos.
Press the preview or scan button and wait for the scan to finish on the glass. If the image comes out clean and straight, setup is done.
What do the four EZ buttons do?
The scanner has four one-touch buttons for PDF, AutoScan, Copy, and Send. They only work once the Canon software and driver are installed and the utility is running.
- PDF scans and saves a page as a PDF. With OCR, the text can become editable and searchable.
- AutoScan detects the page type and picks settings without menus.
- Copy sends the scan to your printer.
- Send opens options to save the file or upload it to cloud services.
Press each button once after setup to confirm it launches the right action. If a button does nothing, the utility isn't running in the background.
How do you scan photos and documents well?
Clean the glass first and pick the right mode for the page. For photos, use the 2400 x 2400 dpi optical resolution and turn on image enhancements like fade correction and dust reduction.
Lay photos flat with no overlap and close the lid fully. For documents you want to search later, scan with OCR so the text becomes selectable.
Before a big scanning session, our guide to how to clean old photos before scanning covers dusting and handling so the digital copies come out sharper.
How do you set up scanning to the cloud?
Use the Send button or the scanning utility's cloud option to link OneDrive or Dropbox, then choose a destination folder. Canon's software handles the upload once you sign in.
Sign in to the cloud account inside the utility first, so the Send button has somewhere to put the file. Then pick a folder structure you'll actually be able to browse later.
Decide on a simple naming pattern before your first batch. A date-first file name sorts itself in most cloud folders without extra work.
Once scans start piling up, the next job is how to organize scanned photos so you can find a specific picture months later.
Why won't the computer detect the Canon LiDE 300?
The usual cause is the connection, not the scanner. Check the cable, the port, and the order you installed things in before assuming the hardware is faulty.
Work through these checks in order:
- Unplug and replug the mini-B end firmly into the scanner.
- Move the USB-A end to a direct port on the computer, not a hub.
- Swap in a known data cable if you have one; some cables only carry power.
- Close the scanning utility and reopen it.
- Reinstall the driver, connecting the scanner only when prompted.
If the scanner appears in the utility but scans fail, the port or cable is still the first suspect. Try a different USB port on the computer.
A scanner that worked yesterday and stopped today usually means a loose cable or a software update. Reboot the computer once before reinstalling anything.
How do you keep the Canon LiDE 300 running cleanly?
Wipe the glass and the lid's white backing regularly, and keep dust off the scanner when it's not in use. A clean glass surface is the single biggest factor in sharp scans.
The Fujitsu 24 Cleaning Wipe is a scanner cleaning wipe, but it is listed as compatible with ScanSnap scanner surfaces, not specifically the LiDE 300 glass.
The Puomue microfiber cloths are the gentler option for the glass and the white lid backing. The pack of 6 gives you spares, and the 16 x 16 inch size covers the whole flatbed in one pass.
Use a dry cloth first to lift loose dust, then a slightly damp one for smudges. Dry the glass fully before closing the lid.
If your computer keeps losing the scanner after a Windows or macOS update, the fix is usually a driver refresh. Our guide to how to get a Fujitsu scanner to work walks through similar detection steps if you ever add a second scanner to the same machine.
Which scanner should you compare before you commit?
The LiDE 300 suits light home scanning of documents and photos. If you scan stacks of paper daily or need a sheet feeder, look at other models before you install this one.
The LiDE 300 handles single sheets on a flatbed, one at a time. That's fine for receipts, forms, and photo prints, but slow for a 50-page document.
For a step up in the same family, see our Canon LiDE 300 vs 400 comparison to weigh resolution and speed against the higher model. The 400 is the one to consider if you scan photos often and want the newer generation.
If your main job is feeding multi-page documents, a sheet-fed scanner is the better fit. A flatbed like the LiDE 300 is the right tool for photos, fragile paper, and anything that can't bend.
How do you finish installing the Canon LiDE 300 scanner?
Connect the cable, install the driver and software, scan one test page, and set up the buttons. If the test page looks right and the PDF button works, the install is complete.
Keep the setup CD and note where you downloaded the driver. That saves time if you reinstall on a new computer later.
Clean the glass before each session and store the scanner with the lid closed. A minute of upkeep keeps scans crisp and avoids streaks in your files.
Once setup is done, the real work begins: turning boxes of paper and prints into a searchable digital archive. Start with how to organize scanned photos so each batch lands in a folder you'll find again.
Frequently asked questions
Does the Canon LiDE 300 need a power adapter?
No. The LiDE 300 is bus-powered, so the single USB cable carries both data and power.
Plug it into a powered USB port on the computer or a powered hub, not an unpowered hub.
Which USB cable does the Canon LiDE 300 use?
It uses a USB 2.0 cable with a standard USB-A end for the computer and a mini-B end for the scanner. Canon includes one in the box, so you only need a replacement if yours is lost or too short.
Can I scan to PDF with the Canon LiDE 300?
Yes. The built-in PDF button on the scanner saves pages as PDF files.
Canon's software also supports OCR so you can make editable and searchable PDFs from printed pages.
Does the Canon LiDE 300 work with Macs and Windows?
Canon provides drivers and software for both Windows and Mac. The minimum system requirement stated for the scanner is Windows 7, so check Canon's current download page for the newest supported operating systems before you install.
How do I get the best scan quality from the LiDE 300?
Clean the glass before each session and let Canon's Auto Scan Mode pick settings for the page type. For photos, use the 2400 x 2400 dpi optical resolution with fade correction and dust reduction turned on.